Today, I would like to give you small insight into production scheme we use at
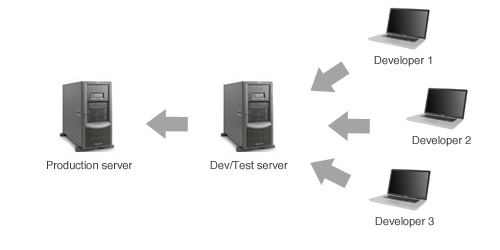
2day. This scheme consists of one production server, one testing server and several development instances, depending on the number of programmers working on a project.
Scheme description
As you can see on the image below, each developer has his own local copy of a project on his machine (including database). Dev/Test server acts as a pre-production environment, where all final test are executed, before pushing project code to a production environment. Note, that after configuration, no direct code changes are made on server machines (Dev/Test nor Production).

Setup
Let's assume you have
GIT installed on all of your machines and you have a website ready on developer's computer. As a first step, you have to turn your website code into GIT repository. On Developer 1 machine:
$cd website
$git init
$git add .
$git commit -m "Initial commit"
These commands will initiate your git repository, stage all your files and commit them into the local repository. (This is very simplified example, I will cover more details about staging and ignoring files in another post). Now that you have your local GIT repository up and running you can set up your Dev/Test remote repository. To do this, you need an SSH access to your Dev/Test machine, ideally with ssh keys set up, so you don't have to type your password every time. On this remote server you create a new repository to mirror the local one:
$ mkdir website.git && cd website.git
$ git init --bare
Now you define a post-receive hook that will check out latest repository tree into your website server's DocumentRoot (this directory must exist, GIT won't create it for you!):
$ mkdir /var/www/www.mywebsite.com
$ vim hooks/post-receive

GIT_WORK_TREE=/var/www/www.mywebsite.com git checkout -f

$ chmod +x hooks/post-receive
Now you can connect these two machines and push your local copy to the remote repository. On Developer 1 machine:
$ git remote add devtest ssh://devtest.server.com/home/unluckyPete/website.git
$ git push devtest +master:refs/heads/master
Dev/Test machine now contains a mirrored copy of your local repository.
To setup your Production server, you can repeat the steps above by substituting Dev/Test server for Production server and Developer 1 for Dev/Test server.
Adding developer
Assume you have a new developer assigned to a project. All he has to do is pull the Dev/Test repository to his local machine and add the Dev/Test repository as a remote.
Workflow
So, feature on which Developer 1 was working is done and commited into his local repository. First, he fetches the remote repository, to check if there were any changes made since his last fetch. He resolves any conflicts that could have happened and feature is ready to be put into Testing environment. All he has to do is type
git push devtest and his changes are written into remote repository. Other developers will receive these changes in their next fetch.
If all tests on Dev/Test machine went OK, changes are ready to be applied to the Production environment. All you have to do is run
git push prod
on your Dev/Test machine. Simple as that.
Advantages
-
Simplicity. By not making any changes directly on your Dev/Test or Production servers you avoid many problems and inconsistencies between your workflow steps.
-
Consistency. See above. In addition all files are compressed, transfered and then written on the remote machine at the same moment, so no more white pages for users caused by transfer errors.
-
Redundancy. Every repository contains complete history of all files and changes made to the project, so in the case that any part of your workflow crashes, you are able to restore it from any other repository.
If you don't like using console to manage your GIT repository I highly recommend
Tower GIT client for Mac.
You can find the
Slovak version on our 2day blog.
Picard out.
p.


Thx for this post, simply and easy to understand!